Introduction: The Unsung Hero of the Fast-Paced Web
What is Image Compression Imagine clicking on a link, and then waiting. And waiting. The text is slow to appear, images pop in piece by piece, and you find yourself staring at a blank screen. In 2026, this isn’t just annoying, it’s the fastest way to lose a visitor. The modern internet is a visual feast, but a poorly optimized one leaves a bad taste.
Every second of delay costs businesses customers, and every unoptimized image hurts a website’s chance of being found on Google. As of this year, the average webpage size has ballooned to over 2.5MB, with images accounting for nearly 65% of that total weight. For a blogger, a store owner, or a developer, understanding what is image compression is no longer a “nice-to-have” technical skill—it’s the foundation of survival in a competitive digital world where speed equals revenue.
Part 1: Deconstructing the Visuals – How Compression Works
To truly master website speed, we have to look under the hood. What happens when you hit “save” on a photo?
1.1 The Raw Truth About Image Data
To a computer, a photograph isn’t a memory; it’s a grid of millions of tiny dots called pixels. A standard 12-megapixel photo from your phone contains 12 million individual data points. If we stored every dot exactly as is, a single 4K image would require a massive 25 MB of space. That is far too big to share on social media or load quickly on a website. This is precisely why image compression is essential.
1.2 The Science of “Tricking” the Eye
Image compression works by finding and eliminating redundancy, often by exploiting how our own eyes work.
- Spatial Redundancy: Think of a picture of a bright blue sky. Why store “blue, blue, blue…” for thousands of spots? Algorithms simply store the instruction: “The next 400 pixels are this specific blue.”
- Psychovisual Redundancy: This is the real “magic.” The human eye is incredibly sensitive to changes in brightness (which helps us see edges and movement) but much less sensitive to fine changes in color. Modern compression throws away a lot of that color data—the stuff your brain wouldn’t have noticed anyway.
1.3 Lossy vs. Lossless: Choosing Your Battles
There are two main ways to compress, and picking the right one depends on the image.
- Lossless Compression: This method shrinks the file size without getting rid of a single pixel of data. When the file opens, it is mathematically identical to the original.
- Lossy Compression: This method permanently removes “less important” data (like that extra color information). This allows for massive file size reductions—often 70% to 90% smaller.
- Best For: Blog photos, product images, and background textures. This is where formats like JPEG, WebP, and AVIF shine.
For most web users, a good image compression tool uses “smart lossy” techniques. It finds the perfect balance where the file is tiny, but the human eye can’t tell the difference.
Part 2: Why Speed is Currency – The SEO Connection
Why all this fuss about file sizes? Because Google is obsessed with user happiness, and nothing makes a user unhappier than a slow site.
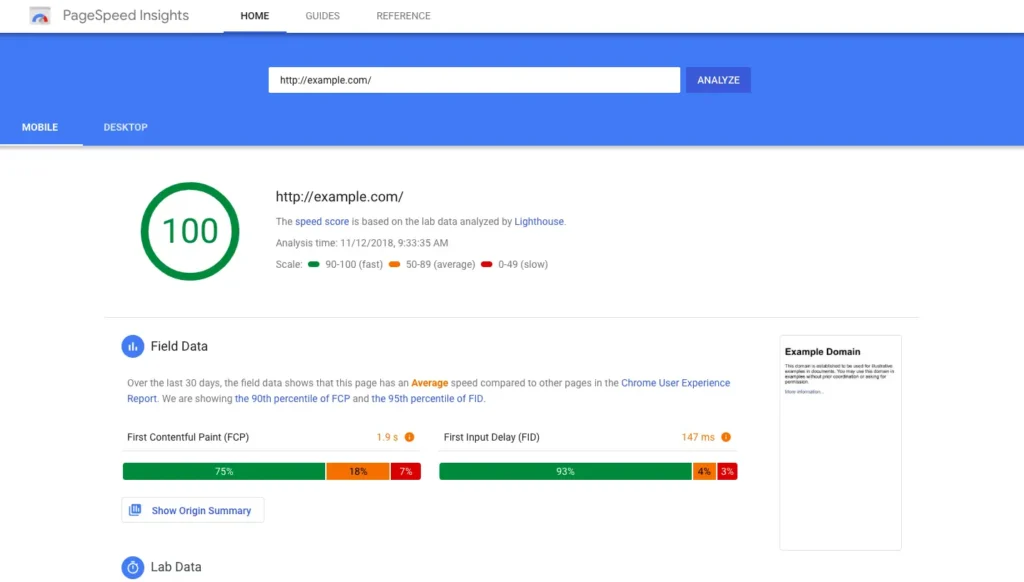
2.1 The Core Web Vitals Mandate
Google’s ranking system now heavily relies on Core Web Vitals, a set of measurements for user experience. The most critical metric for images is Largest Contentful Paint (LCP) —the time it takes for the biggest image on the page (usually a hero banner) to load.
- The Rule: Your LCP must happen within 2.5 seconds.
- The Penalty: If your hero image is a heavy, uncompressed file, it fails this test. Google sees the poor experience and demotes your page in search results, no matter how brilliant your writing is.
2.2 The “Micro-Moment” Economy
Data from 2025-2026 shows that a 0.1-second improvement in mobile site speed can boost conversion rates by over 8%. When a user clicks a link, they expect instant gratification. If a large PNG file takes too long, the user hits the “Back” button. This “bounce” tells Google your site is low-value. By running images through a reliable image compression tool before uploading, you shave off critical seconds, keeping users happy and rankings high.
Read Also: The Future of Image Compression with AI in 2025
Part 3: The 2026 Format Landscape – What to Use and Why
In the past, you had two choices: JPEG for photos, PNG for graphics. Today, the playing field is more advanced.
3.1 The Contenders
- JPEG: The veteran. It works everywhere, but its technology is decades old. It lacks support for modern features like transparency.
- WebP: Google’s answer to the JPEG limitation. It offers 25-35% better compression than JPEG and supports transparency and animation .
- AVIF: The current champion. Derived from the AV1 video codec, AVIF can reduce file sizes by 50% compared to JPEG while maintaining superior color quality and fewer visual glitches (artifacts) .
3.2 The Smart Workflow with an Image Compression Tool
Knowing the formats is one thing; implementing them is another. You don’t need to be a coding wizard to get it right. Here is the professional workflow for 2026:
Step 1: Resize Before You Optimize
Never upload a 4000px wide image if your blog post only shows it at 800px. Resizing the dimensions first saves massive weight before compression even starts.
Step 2: Use a Reliable Tool
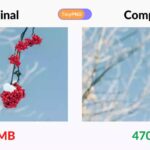
Don’t rely on basic software. Use a dedicated image compression tool to handle the heavy lifting. For example, if you are looking for a tool that balances power with ease of use, exploring options like tinypng.cloud can provide a seamless way to bulk-process images, ensuring your media library stays lean without a tedious manual workflow.
Step 3: Implement “Lazy Loading”
Add loading="lazy" to your image codes. This tells the browser to only load images when the user scrolls down to them, speeding up the initial page view dramatically.
Step 4: Use the <picture> Tag for Fallbacks
This code tells a modern browser to load the tiny AVIF file first. If the browser is older, it falls back to WebP or JPEG. You serve the best experience to everyone.
Part 4: Advanced Insights – Picking the Right Encoder
For those who like to dive deep, it’s worth knowing that not all JPEGs are created equal. The software used to encode the image matters.
4.1 MozJPEG vs. Guetzli
- MozJPEG: Created by Mozilla, this is the workhorse of the web. It creates smaller JPEG files with progressive scanning (loading in waves) and is fast enough for high-volume use . It is the practical choice for most websites.
- Guetzli: Developed by Google, this encoder focuses on “psychovisual” modeling. It creates extremely high-quality, small files, but it is painfully slow-sometimes taking minutes per image. It is a niche tool best for one-time archival projects where time is no object.
Part 5: The Future – AI-Powered Compression
We are entering the era of Neural Compression. Instead of applying a blanket formula, AI models are now learning to understand the content of an image. If the AI recognizes a face, it will preserve every detail of the eyes and skin texture (where the viewer looks) while aggressively compressing the blurry background. This “content-aware” approach is allowing for 100KB images that look like 2MB originals . Soon, your image compression tool won’t just shrink files, it will intelligently edit them in real-time.
1. What is image compression in simple terms?
Image compression is like packing a suitcase for a trip. Instead of throwing clothes in loosely (taking up lots of space), you fold them tightly and roll them up. The clothes are still the same clothes, but they take up less room. Similarly, compression shrinks the digital “space” an image takes up so your website loads faster.
2. Does compressing an image reduce quality?
It depends on the method. Lossless compression keeps the quality 100% identical to the original. Lossy compression reduces quality slightly to achieve much smaller file sizes, but a good image compression tool does this so intelligently that the human eye usually can’t see the difference.
3. What is the best image format for a fast website in 2026?
AVIF is currently the best format for balancing quality and tiny file sizes, offering up to 50% better compression than JPEG. WebP is an excellent, reliable second choice with broader support. You can use a tool to convert your old JPEGs to these modern formats.
4. How does image compression help with SEO?
It directly improves your Core Web Vitals, specifically the Largest Contentful Paint (LCP) score. Faster loading pages lead to lower bounce rates, which signals to Google that your site provides a good user experience, boosting your rankings.
5. What is a “lossless” image format?
A lossless format reduces file size without discarding any data. When you open the image, it is pixel-for-pixel identical to the original. PNG is the most common example, perfect for logos and graphics with sharp text.
6. Why is my PNG file still so big after taking a screenshot?
Screenshots often contain complex, high-contrast data (like text and UI elements) that don’t compress well with simple methods. You need to run them through a specialized image compression tool that can intelligently reduce the color palette or convert them to a more efficient format like WebP.
7. Can I compress images on my iPhone or Android?
Yes. While there are many apps available, for website owners, it’s usually better to upload photos to your computer or directly to a web-based image compression tool to ensure consistency and quality before they ever hit your server.
8. What are “artifacts” in a compressed image?
Artifacts are the visual glitches caused by over-compression—usually seen as blocky squares, blurry fuzziness, or “halos” around sharp edges. They happen when too much data is thrown away. Modern tools and formats (like AVIF) are designed to minimize these artifacts.
9. Is it better to compress images before or after uploading to WordPress?
Before. While WordPress has plugins that compress on the fly, compressing the image locally first (using a tool) ensures the cleanest, smallest version is uploaded. This reduces server load and guarantees the best possible result.
10. How many times can I compress an image without destroying it?
You can run lossless compression multiple times without changing the image (though you won’t shrink it further after the first time). However, lossy compression is destructive. You should always keep a master copy of the original high-quality image and compress copies from that master. Re-compressing a lossy file will multiply the artifacts and ruin the quality.
Conclusion
In the visual internet of 2026, mastering image compression is the secret weapon of successful websites. It bridges the gap between high-quality design and high-speed performance. By understanding the tools, formats, and techniques outlined in this guide, and utilizing a powerful image compression tool like those found at tinypng.cloud for your workflow, you ensure that your content doesn’t just look good. It loads fast, ranks high, and keeps your visitors happy.